Wednesday, September 26, 2012
Blog has re-homed
Just a quick update to let readers know this blog has re-homed. This blog will remain here for posterity but it will now longer be receiving updates. This blog in the future is accessible at the link below

Thursday, December 8, 2011
Unity3D iPhone Player and JIRA Connect Integration
We've been using JIRA internally for our project management and bug tracking for a couple of years now and we've found it to be excellent. Recently Atlassian (the developers of JIRA) released a JIRA Connect library for the iPad/iPhone family.
If you are developing an iPad or iPhone application this library gives you application bug and error reporting, which integrates with JIRA for very little effort.
Using JIRA Connect with Unity3D iPhone together in order to provide a nice way of automatically delivering crash reports and user feedback to your Unity application. For Unity users targeting the iPad/iPhone this quick little boon works for us to. Here is how to do it.
At this point of this post I'm assuming you're familiar somewhat with JIRA and have a working JIRA instance, or are perhaps using the hosted JIRA solution offered by Atlassian (we much prefer to host our own - because we like control like that).
In your JIRA instance; enable the JIRA Connect plugin, the JIRA Connect user and get your API Key from the Administration panel.
Go and download the JIRA Connect source from here.
To get this integration working for Unity iPad/iPhone builds we're going to patch the Unity player source code that gets spat out
by Unity when you make a Unity iPad/iPhone build.
To have a starting position; make a Unity iPad/iPhone build now. Typically, if I have a project directory "ProjectName" I output my iPad/iPhone player build to "ProjectName_build". Generate this now.
Unpack the JIRA Connect source code you have downloaded.
At this point my directory looks like something like (I'm using OSX Lion)
Open the Xcode project file in your ProjectName_build directory in Xcode. I am using Xcode 4 btw.
We are now going to make some changes to the project that Unity has spat out for us, in order to make use of JIRA Connect. We're basically following the instructions from here.
So the steps as I see them for Xcode 4.
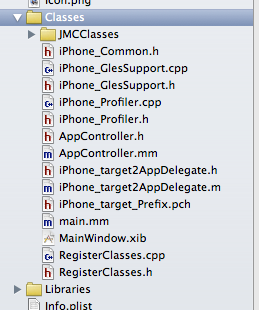
Choose the AppController.mm file in the Classes directory. We're going to edit this to integrate JIRA Connect.
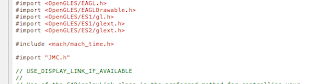
Near the top of AppController.mm we'll add the import statement
Now move down further in the AppController.mm file and find the ApplicationDidFinishLaunching method. We're going to add the follow code in order to activate the library code when our application starts. Note that you'll need to alter this code from my example code in order for JIRA Connect to work with your JIRA instance. Specifically you'll need you JIRA instance's web address and it's API key. You might also want to change the configurations options to suit.
When done applicationDidFinishLaunching will look something like this.
We were particularly interested in the crash reporting, so for the most part that's all we setup.
So if you've done this. Check it all compiles and your Unity application still runs.
If it all works we're now in a good position to generate some patches that we'll use to automatically update our Unity build from each time we make a build in Unity.
Create another build outputting it to somewhere like ProjectName_build_vanilla.
Create a some patches using diff.
Move these patches to ProjectName/Assets/Editor where they can easily be accessed during the Unity build process.
Now we're going to modify the Unity build post process to apply our patches every time we make a build. So, if it doesn't already exist we will create a file called ProjectName/Assets/Editor/PostprocessBuildPlayer. This file is the standard way Unity permits modifications to the build pipeline.
The contents of our PostprocessBuildPlayer file looks like.
It is just a quick and dirty bash script that applies our patches to the Unity iPad/iPhone player build every time we do a build. Once you've got this working you're now got JIRA Connect integrated into your Unity application.
If you have trouble getting the JIRA Connect library working, define "DEBUG" in the build and the JIRA Connect library will log more information (to the Xcode console) about that it is trying to do when the application starts. This will help you work out what is wrong.
Hope this works for you and please do lets us know if this guide needs updating/error correcting.
If you are developing an iPad or iPhone application this library gives you application bug and error reporting, which integrates with JIRA for very little effort.
Using JIRA Connect with Unity3D iPhone together in order to provide a nice way of automatically delivering crash reports and user feedback to your Unity application. For Unity users targeting the iPad/iPhone this quick little boon works for us to. Here is how to do it.
At this point of this post I'm assuming you're familiar somewhat with JIRA and have a working JIRA instance, or are perhaps using the hosted JIRA solution offered by Atlassian (we much prefer to host our own - because we like control like that).
In your JIRA instance; enable the JIRA Connect plugin, the JIRA Connect user and get your API Key from the Administration panel.
Go and download the JIRA Connect source from here.
To get this integration working for Unity iPad/iPhone builds we're going to patch the Unity player source code that gets spat out
by Unity when you make a Unity iPad/iPhone build.
To have a starting position; make a Unity iPad/iPhone build now. Typically, if I have a project directory "ProjectName" I output my iPad/iPhone player build to "ProjectName_build". Generate this now.
Unpack the JIRA Connect source code you have downloaded.
At this point my directory looks like something like (I'm using OSX Lion)
leberkaese: chriskruger$ ls
atlassian-jiraconnect-ios-tip
ProjectName
ProjectName_build
leberkaese: chriskruger$
Open the Xcode project file in your ProjectName_build directory in Xcode. I am using Xcode 4 btw.
We are now going to make some changes to the project that Unity has spat out for us, in order to make use of JIRA Connect. We're basically following the instructions from here.
So the steps as I see them for Xcode 4.
- Add the JMCClasses directory to your Unity-iPhone/Classes group. Right click on the Classes group and choose to Add Files to Unity-iPhone. Browse to the atlassian-jiraconnect-ios-tip/JIRAConnect and choose the JMCClasses directory. Select to "make groups for any added folders" and press Add
- Select the Unity-iPhone project root in the project explorer, select the Unity-iPhone target and the Summary tab. Scroll down to the Linked Frameworks and Libraries. Add the following libraries for linking, CFNetwork, SystemConfiguration, MobileCoreServices, CoreGraphics, AVFoundation, CoreLocation, libsqlite

Choose the AppController.mm file in the Classes directory. We're going to edit this to integrate JIRA Connect.
Near the top of AppController.mm we'll add the import statement

Now move down further in the AppController.mm file and find the ApplicationDidFinishLaunching method. We're going to add the follow code in order to activate the library code when our application starts. Note that you'll need to alter this code from my example code in order for JIRA Connect to work with your JIRA instance. Specifically you'll need you JIRA instance's web address and it's API key. You might also want to change the configurations options to suit.
When done applicationDidFinishLaunching will look something like this.
- (void) applicationDidFinishLaunching:(UIApplication*)application
{
 printf_console("-> applicationDidFinishLaunching()\n");

    JMCOptions* options = [JMCOptions optionsWithUrl:@"https://project.jira.com/"
                                             project:@"PK"
                                              apiKey:@"XXXXXXX-XXXXX-XXXX-XXX-XXXXXXXXXX"
                                              photos:NO
                                               voice:NO
                                            location:NO
                                       crashreporting:YES
                                        customFields:nil];

    [[JMC instance] configureWithOptions:options];


 if ([UIDevice currentDevice].generatesDeviceOrientationNotifications == NO)
  [[UIDevice currentDevice] beginGeneratingDeviceOrientationNotifications];

 [self startUnity:application];
}
We were particularly interested in the crash reporting, so for the most part that's all we setup.
So if you've done this. Check it all compiles and your Unity application still runs.
If it all works we're now in a good position to generate some patches that we'll use to automatically update our Unity build from each time we make a build in Unity.
Create another build outputting it to somewhere like ProjectName_build_vanilla.
Create a some patches using diff.
diff  -ru ProjectName_build_vanilla/Unity-iPhone.xcodeproj/project.pbxproj ProjectName_build/Unity-iPhone.xcodeproj/project.pbxproj > xcode.patch

diff -ru ProjectName_build_vanilla/Classes/AppController.mm ProjectName_build/Classes/AppController.mm > AppController.patch
Move these patches to ProjectName/Assets/Editor where they can easily be accessed during the Unity build process.
Now we're going to modify the Unity build post process to apply our patches every time we make a build. So, if it doesn't already exist we will create a file called ProjectName/Assets/Editor/PostprocessBuildPlayer. This file is the standard way Unity permits modifications to the build pipeline.
The contents of our PostprocessBuildPlayer file looks like.
#!/bin/bash

DIR=${0%/*}
INSTALLPATH=${1}
TARGET=${2}
OPT=${3}
COMPANY=${4}
PRODUCT=${5}
LOG=postprocess.txt

echo "Postprocess Start" > ${LOG}
echo "TARGET = ${TARGET}, PRODUCT = ${PRODUCT}" >> ${LOG}
echo "INSTALLPATH = ${INSTALLPATH}" >> ${LOG}

if [ $PRODUCT == "ProductName" ]
then

if [ "${TARGET}" == "iPhone" ]
then
 echo "Applying patches for AppController and Xcode" >> ${LOG}
 (cd ${INSTALLPATH}; patch -N -p1 < ${DIR}/AppController.patch)
 (cd ${INSTALLPATH}; patch -N -p1 < ${DIR}/xcode.patch)
fi

fi
It is just a quick and dirty bash script that applies our patches to the Unity iPad/iPhone player build every time we do a build. Once you've got this working you're now got JIRA Connect integrated into your Unity application.
If you have trouble getting the JIRA Connect library working, define "DEBUG" in the build and the JIRA Connect library will log more information (to the Xcode console) about that it is trying to do when the application starts. This will help you work out what is wrong.
Hope this works for you and please do lets us know if this guide needs updating/error correcting.
Thursday, October 20, 2011
Unity 3D (Pro): View matrix (separately) for CG shaders
As Unity's shader support is largely based on Open GL, there isn't, by default design, access to separate model and view matrices in shader code. Occasionally you might want access to this and to use it you'll need to pass this information in yourself.
Just a quick summary of what Unity does provide in Shader code.
Very occasionally I wish there was a UNITY_MATRIX_M and UNITY_MATRIX_V but there isn't - at least - not yet. (Same limitation in GLSL)
In C# we can get the view matrix from Camera.mainCamera.worldToCameraMatrix and for GameObjects the model matrix can be generated by using Matrix4x4.TRS( transform.position, transform.rotation, transform.localScale).
If we wanted to pass in our own modelView matrix we could do
Then at the appropriate point we can do
To pass this model view matrix into our shader.
In our shader, presumably in the vertex shader we can then use this value like so
The result of the above code is exactly the same as
So now knowing this you can manipulate and/or use the model and view matrices separately in your shaders if you so choose, by first passing them in from script code.
Just a quick summary of what Unity does provide in Shader code.
- UNITY_MATRIX_MVP - Current model * view * project matrix
- UNITY_MATRIX_MV - Current mode * view matrix
- UNITY_MATRIX_P - Current project matrix
- _Object2World - Current model matrix
- _World2Object - Inverse of current world matrix
Very occasionally I wish there was a UNITY_MATRIX_M and UNITY_MATRIX_V but there isn't - at least - not yet. (Same limitation in GLSL)
In C# we can get the view matrix from Camera.mainCamera.worldToCameraMatrix and for GameObjects the model matrix can be generated by using Matrix4x4.TRS( transform.position, transform.rotation, transform.localScale).
If we wanted to pass in our own modelView matrix we could do
Matrix4x4 modelViewMatrix = Camera.mainCamera.worldToCameraMatrix * Matrix4x4.TRS( transform.position, transform.rotation, transform.localScale);
Then at the appropriate point we can do
material.SetMatrix("modelView", modelViewMatrix); To pass this model view matrix into our shader.
In our shader, presumably in the vertex shader we can then use this value like so
v2f vert(appdata_base v)
     {
         v2f o;
         o.pos = mul( mul(UNITY_MATRIX_P, modelView), v.vertex );
         return o;
     }
The result of the above code is exactly the same as
o.pos = mul( UNITY_MATRIX_MVP, v.vertex );
So now knowing this you can manipulate and/or use the model and view matrices separately in your shaders if you so choose, by first passing them in from script code.
Tuesday, October 11, 2011
Moving iPhone Developer Credentials from one Mac to another
Update: So apparently in Xcode 4 (at least) there is an official way to do this... outlined here
I recently reinstalled OSX on my Mac and upgraded to Lion. Of course I forgot to transfer my iPhone developer credentials before I did it. I had to go back to the provisioning portal and setup my new certificate and get a new developer profile. While it wasn't a huge time waste I should have transferred my certificates and profile to save myself some time.
This is what I should have done.
NOTE: There is a very annoying bug in Keychain Access that means you need to re-import your certificates at the command line. Attempting to you import you certificates using the Keychain Access GUI yields "An error has occurred. Unable to import an item. The contents of this item cannot be retrieved". This is just a blatant bug in Keychain Access you can import the files into Keychain Access at the command line with the following commands.
I recently reinstalled OSX on my Mac and upgraded to Lion. Of course I forgot to transfer my iPhone developer credentials before I did it. I had to go back to the provisioning portal and setup my new certificate and get a new developer profile. While it wasn't a huge time waste I should have transferred my certificates and profile to save myself some time.
This is what I should have done.
- Open Xcode
- DEVELOPMENT -> Provisioning Profiles
- Choose your Provisioning profile, right click and "Reveal in Finder"
- Save the resulting file
- Open Keychain Access
- Export your private and public certificates to files and save them
- Transfer all the file to your new system
- Drag and drop Provisioning Profile into Xcode's Organiser on your new system
- Import the certificates file you exported into Keychain Access on your new system
NOTE: There is a very annoying bug in Keychain Access that means you need to re-import your certificates at the command line. Attempting to you import you certificates using the Keychain Access GUI yields "An error has occurred. Unable to import an item. The contents of this item cannot be retrieved". This is just a blatant bug in Keychain Access you can import the files into Keychain Access at the command line with the following commands.
security import priv_key.p12 -k ~/Library/Keychains/login.keychain
security import pub_key.pem -k ~/Library/Keychains/login.keychain
Thursday, August 4, 2011
Xcode 3.2.6 and OSX Lion (10.7) - Make it install
Today I enthusiastically installed OSX Lion on my development system. I was probably stupidly naive to think it would be a straightforward upgrade.
Attempting to install Xcode 3.2.6, the version I currently prefer, it seemed to silently fail. I wasn't sure why. I did notice running the installation wizard; that at the point of selecting Installation Components the Xcode Tool Set component (Usually compulsory) was greyed out and marked as skip.
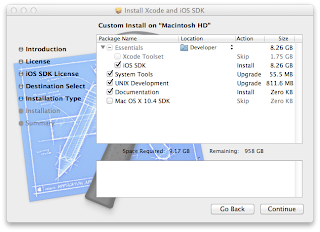
After some research, It seems support for Xcode 3.2.6 on Lion is somewhat neglected as Xcode 4.x is the future. Long story short I needed to use 3.2.6. It can be motivated to install on Lion.
After mounting the developer tools dmg you can open a terminal and issue the following commands to successfully install Xcode 3.2.6 on OSX Lion (10.7)
Attempting to install Xcode 3.2.6, the version I currently prefer, it seemed to silently fail. I wasn't sure why. I did notice running the installation wizard; that at the point of selecting Installation Components the Xcode Tool Set component (Usually compulsory) was greyed out and marked as skip.

After some research, It seems support for Xcode 3.2.6 on Lion is somewhat neglected as Xcode 4.x is the future. Long story short I needed to use 3.2.6. It can be motivated to install on Lion.
After mounting the developer tools dmg you can open a terminal and issue the following commands to successfully install Xcode 3.2.6 on OSX Lion (10.7)
export COMMAND_LINE_INSTALL=1
open "/Volumes/Xcode and iOS SDK/Xcode and iOS SDK.mpkg"
Unity3D Asset Server: Best Practice Workflow - Initial Checkout
Using Unity in teams one is often stuck using Unity asset server. While it certainly lacks features one has grown accustomed to in many other source control systems the fact remains that it is the solution that most seamlessly works with Unity.
I think part of making the process of working with Unity Asset Server more enjoyable (apart form having experience with it) is to stick with some simple best practices.
I think part of making the process of working with Unity Asset Server more enjoyable (apart form having experience with it) is to stick with some simple best practices.
Checking out a Unity project for the first time
- Find out what the project is called. You can do this looking looking at the server via another project.
- When opening Unity - choose to "Create new project". Give it the same name as the project is know by in asset server.
- Open this new project and connect to the server (ALT-0 or CMD-0 depending on operating system)
- Identify the project you are checking out and connect to it
- Choose to Update
- You'll be asked to make a decision about conflicting assets. Make sure you discard all existing files in the new project ("Discard My Changes"). This seems a little unintuitive but it makes sure you won't clutter your project or accidentally suck in unwanted files.
Thursday, July 21, 2011
Tell (automake) configure to use specific architecture on Mac OSX
Where we want to build 32 bit binary on OSX, and we know the codebase has a mix of C and C++ code.
ARCHFLAGS="-arch i386" CFLAGS="-arch i386" CPPFLAGS="-arch i386" LDFLAGS="-arch i386" ./configure
Monday, June 20, 2011
Xcode: iPhone or iPad application code sign error
This morning on a re-imaged OSX machine I attempted to compile an ipad application and I was rewarded with the error below.
I was puzzled. I'd already made a developer certificate request to Apple, had it signed and installed it in my Keychain Access, I'd also downloaded and installed the Apple Worldwide Developer Relations Certification Authority certificate. I'd installed the required development profile that matched my ipad device Unique Identifier, my personal developer certificate and the application I am developing but still, every time I hit build it gave me a code sign error. I didn't get it.
At some point it a suspicion formed. In my Keychain Access I noticed my certificates where installed in the System keychain. I'm not even sure why they got installed there, I don't think I did it explicitly.
I moved my certificates to the login keychain which I assume belongs to the logged in user on OSX (i.e. myself). Attempting to re-compile the source code of my ipad project yield a positive result. Moving the certificates to the login keychain seemed to work! So I post my small solution here today in the hope that somebody else might benefit.
codesign error: code signing identity 'iphone developer' does not match any code-signing certificate in your keychain. once added to the keychain, touch a file or clean the project to continue.I was puzzled. I'd already made a developer certificate request to Apple, had it signed and installed it in my Keychain Access, I'd also downloaded and installed the Apple Worldwide Developer Relations Certification Authority certificate. I'd installed the required development profile that matched my ipad device Unique Identifier, my personal developer certificate and the application I am developing but still, every time I hit build it gave me a code sign error. I didn't get it.
At some point it a suspicion formed. In my Keychain Access I noticed my certificates where installed in the System keychain. I'm not even sure why they got installed there, I don't think I did it explicitly.
I moved my certificates to the login keychain which I assume belongs to the logged in user on OSX (i.e. myself). Attempting to re-compile the source code of my ipad project yield a positive result. Moving the certificates to the login keychain seemed to work! So I post my small solution here today in the hope that somebody else might benefit.
Thursday, June 16, 2011
Oh Magic Mouse! How do I hate thee.
While Apple have, over the years, had many design wins, there have also been some unfortunate design failures. The design failure that happens to torment me on a daily basis is Apple's Magic Mouse. Admittedly this bluetooth mouse is quite responsive and accurate as a pointing device, but it's the mouse's more esoteric features which are pimped as a unique selling point that really irk me. Namely the "multi touch surface", especially when used for scrolling.
The multi touch surface is just far too sensitive and easily triggered when you're just using the mouse to move the pointer. As a coder I spend most of my day in text editors. I'm always accidentally scrolling the text window up and down; even worse - when using the command key and accidentally scrolling, the most common behaviour is to zoom. Not helpful. Give me an old fashioned scroll wheel any day. Likewise in a 3D modelling package I often find myself accidentally zooming.
It's back to the simple $20 mouse for me. On a similar note I have a theory about the efficacy of mice based on price. The sweet spot on mouse functionality is definitely around the $20 mark. Pay more and "features" get in the way. Pay less and accuracy, reliability and that comforting solid hand weight quality possessed by a good mouse are absent.

The multi touch surface is just far too sensitive and easily triggered when you're just using the mouse to move the pointer. As a coder I spend most of my day in text editors. I'm always accidentally scrolling the text window up and down; even worse - when using the command key and accidentally scrolling, the most common behaviour is to zoom. Not helpful. Give me an old fashioned scroll wheel any day. Likewise in a 3D modelling package I often find myself accidentally zooming.
It's back to the simple $20 mouse for me. On a similar note I have a theory about the efficacy of mice based on price. The sweet spot on mouse functionality is definitely around the $20 mark. Pay more and "features" get in the way. Pay less and accuracy, reliability and that comforting solid hand weight quality possessed by a good mouse are absent.

Tuesday, June 14, 2011
Schedule Mac OSX Update(s) for Offpeak Download using launchd
In order to schedule you Mac OSX software update to run in Offpeak time you can use the launchd system scheduler in order to to accomplish this. On most Unix systems (including cousins and derivates like Mac OSX) you would use cron. While cron is still available on Mac OSX, Apple have provided an Apple centric way of doing the same the work in the form of launchd.
Launchd has a command line control interface that goes by the name of launchctl, which will be using in conjuction with our xml editing skills to achieve this goal.
The software update tool normally accessible via the Apple Menu (Apple->Software Update to be exact) has a command line parallel "softwareupdate". We can use this command line version to run the update in the background at suitably early hour of the morning.
First of all lets construct a launchd configuration file to setup this job for us. In the common Mac OSX fashion this is achieved via the use of a property list file. Essentially an XML file with the information we want in it. A suitable .plist file for this work is listed below. Save this text into a file name like
This particular property list configuration file schedules the software update to run at 2 am every morning.
Now because this task is a system related task we need it to be run by the superuser in order to have sufficient privileges for this to happen. As this is the case I'd be storing this configuration file in
Next we load the configuration file in order to schedule it. We can accomplish this with superuser privileges by the doing the following:
We can view the task is loaded and ready to roll by issuing:
You should see the task there, if not, you might have a problem.
The task will run every period you specified until you unload it (or reboot - we did not specify it should load itself).
You can unload the task using the command:
On a typically configured Mac, it will be setup to go to sleep if left on for a period of time. Obviously this will affect the running of your scheduled task. In order to make sure you schedule task will run I would schedule your machine to wakeup 5 minutes before the scheduled task is due to run. In this case at 1:55 AM. This just gives subsystems like WiFi time to reconnect to the wireless router.
Sleep scheduling for wake up is done via Apple->System Preferences->Energy Saver->Schedule->Start or Wakeup
When you come back to your system in the morning you should find your software updates ready to install. Replacing the keyword "--download" with "--install" in the property list file above you can get your updates to install (not just download) overnight also.
Launchd has a command line control interface that goes by the name of launchctl, which will be using in conjuction with our xml editing skills to achieve this goal.
The software update tool normally accessible via the Apple Menu (Apple->Software Update to be exact) has a command line parallel "softwareupdate". We can use this command line version to run the update in the background at suitably early hour of the morning.
First of all lets construct a launchd configuration file to setup this job for us. In the common Mac OSX fashion this is achieved via the use of a property list file. Essentially an XML file with the information we want in it. A suitable .plist file for this work is listed below. Save this text into a file name like
com.krugerheavyindustries.SoftwareUpdate.plist
<?xml version="1.0" encoding="UTF-8"?>
<!DOCTYPE plist PUBLIC "-//Apple Computer//DTD PLIST 1.0//EN""http://www.apple.com/DTDs/PropertyList-1.0.dtd">
<plist version="1.0">
<dict>
    <key>Label</key>
    <string>com.krugerheavyindustries.SoftwareUpdate</string>
    <key>ProgramArguments</key>
    <array>
        <string>/usr/sbin/softwareupdate</string>
        <string>--download</string>
        <string>--all</string>
    </array>
    <key>StartCalendarInterval</key>
    <dict>
        <key>Hour</key>
        <integer>2</integer>
        <key>Minute</key>
        <integer>00</integer>
    </dict>
    <key>StandardErrorPath</key>
    <string>/var/log/software-update.log</string>
    <key>StandardOutPath</key>
    <string>/var/log/software-update.log</string>
</dict>
</plist>
This particular property list configuration file schedules the software update to run at 2 am every morning.
Now because this task is a system related task we need it to be run by the superuser in order to have sufficient privileges for this to happen. As this is the case I'd be storing this configuration file in
/Library/LaunchDaemonNext we load the configuration file in order to schedule it. We can accomplish this with superuser privileges by the doing the following:
sudo launchctrl load /Library/LaunchDaemon/com.krugerheavyindustries.SoftwareUpdate.plistWe can view the task is loaded and ready to roll by issuing:
sudo launchctl list | grep SoftwareUpdateYou should see the task there, if not, you might have a problem.
The task will run every period you specified until you unload it (or reboot - we did not specify it should load itself).
You can unload the task using the command:
sudo launchctl unload /Library/LaunchDaemon/com.krugerheavyindustries.SoftwareUpdate.plistOn a typically configured Mac, it will be setup to go to sleep if left on for a period of time. Obviously this will affect the running of your scheduled task. In order to make sure you schedule task will run I would schedule your machine to wakeup 5 minutes before the scheduled task is due to run. In this case at 1:55 AM. This just gives subsystems like WiFi time to reconnect to the wireless router.
Sleep scheduling for wake up is done via Apple->System Preferences->Energy Saver->Schedule->Start or Wakeup
When you come back to your system in the morning you should find your software updates ready to install. Replacing the keyword "--download" with "--install" in the property list file above you can get your updates to install (not just download) overnight also.
Thursday, January 27, 2011
Games Development: A poster child for learning maths at school?
I catch the train to work most mornings. I get so much screen time every day I often like to zone out on the way to work. Driving, avoiding pedestrians and other cars cuts into my zone out time. The train works for me. I don't have to concentrate. I can look out the window, watch people and occasionally eavesdrops on some conversations people are having on the train. Yes, I'm kind of a sticky beak.
The other morning I was largely alone in my section of the train. I was joined at the next stop by half-a-dozen teenage guys in school uniform on their way to school. In fairly typical teenage boy fashion they were talking loud, all pumped in the presence of their mates and talking about people they went to school with.
After several topic changes which I couldn't follow (I don't think I'm across even half of what is 'street' these days) they settled on a conversation about how much maths sucks.
Bigfoot zitty kid : "Maths is so lame. You never use that crap. Like algebra.. what are you going to ever use that for?"
Sporty kid : "Yeah my dad reckons he's never used maths since he learned it, it's stupid - why do they even teach stuff like calculus. When the hell would you ever use that?"
Nods of agreement all around.
I didn't find it particularly surprising. In fact, I'm pretty sure I had a conversation just like that around the age of 15.
What I did find ironic was the next topic of the conversation I was sneaky beaking on. They started talking about video games, and how cool it would be to make them. It struck me as ironic, because right there in front of them was a profession that actually used maths, and potentially quite heavily, to actually do things that are interesting to this demographic. It occurred to me right then - that Games Development is quite possibly the perfect poster child career for demonstrating to kids what value you might actually get from learning maths.
Modern games are using plenty of math. Every interaction on the screen is a cascade of vectors, linear algebra and geometry. You've often got some Newtonian Physics thrown in there for good measure too.
I wanted to interject, but I resisted. I didn't want to blow my cover as the zoned out guy in the corner, I wanted to hear about what games they enjoyed playing.
Chris K.
The other morning I was largely alone in my section of the train. I was joined at the next stop by half-a-dozen teenage guys in school uniform on their way to school. In fairly typical teenage boy fashion they were talking loud, all pumped in the presence of their mates and talking about people they went to school with.
After several topic changes which I couldn't follow (I don't think I'm across even half of what is 'street' these days) they settled on a conversation about how much maths sucks.
Bigfoot zitty kid : "Maths is so lame. You never use that crap. Like algebra.. what are you going to ever use that for?"
Sporty kid : "Yeah my dad reckons he's never used maths since he learned it, it's stupid - why do they even teach stuff like calculus. When the hell would you ever use that?"
Nods of agreement all around.
I didn't find it particularly surprising. In fact, I'm pretty sure I had a conversation just like that around the age of 15.
What I did find ironic was the next topic of the conversation I was sneaky beaking on. They started talking about video games, and how cool it would be to make them. It struck me as ironic, because right there in front of them was a profession that actually used maths, and potentially quite heavily, to actually do things that are interesting to this demographic. It occurred to me right then - that Games Development is quite possibly the perfect poster child career for demonstrating to kids what value you might actually get from learning maths.
Modern games are using plenty of math. Every interaction on the screen is a cascade of vectors, linear algebra and geometry. You've often got some Newtonian Physics thrown in there for good measure too.
I wanted to interject, but I resisted. I didn't want to blow my cover as the zoned out guy in the corner, I wanted to hear about what games they enjoyed playing.
Chris K.
Eets: Hunger it's Emotional - Released for Macintosh OSX
Somewhat belatedly we're pleased to announce the release of Eets: Hunger it's Emotional for OSX! It was released on Steam last December, and you can check it out here
Whew. That was quite an effort for a small team like ours. It was a labour of love. While it's not the only thing we've worked on this past year, we've certainly taken our time when getting it done.
While it is a port (for us) and the game content had already been completed since the release of the PC version it was still not a jobn for the faint of heart.
Klei Entertainment when originally developing the game had not envisaged that the title would be destined for several other platforms. As such it was written largely in native windows APIs such as DirectX, Direct sound, windows threading and so on. There was little abtraction in the graphics, sound and IO layers.
So we added all of that. We abstracted the graphics layer and put into place an OpenGL driver for the OSX port, we went through a similar process for sound support making use of OpenAL. For threading we just used pthreads for the most part. Perhaps we should have abstracted but we didn't in that case. The shaders were written in DirectX style assembly language and to move them over to OpenGL they were ported into HLSL.
Everytime we finish a title we're reminded of what it takes to actually finish a game.
You feel like your done, when it's feature complete; the graphics and sound are working, the control system is squared away and yet - you're really just half way.
We admit we felt like we'd finished when we reached this feature complete stage; we knew better intellectually but emotionally we fell for it all over again.
At feature complete, you start the gruelling bug fixing stage. It's amazing how many bugs a few good testers can find. We had hundreds, many pretty small but it adds mountains of time to completion. After bug fixing, you then have to package and prep for distribution, this is also suprisingly time consuming. Sorting out distribution platforms quirks, further testing, prepping marking art, liasing with the publishers, partners, testers, reviewers and so on - and we had a lot of help.
Nothing really beats the feeling of finish a title though. At least from our point of view. There is something deeply satisfying about it. I guess that's why we're in this business.
We hope you enjoy Eets for OSX! We certainly enjoyed getting it out there.
Whew. That was quite an effort for a small team like ours. It was a labour of love. While it's not the only thing we've worked on this past year, we've certainly taken our time when getting it done.
While it is a port (for us) and the game content had already been completed since the release of the PC version it was still not a jobn for the faint of heart.
Klei Entertainment when originally developing the game had not envisaged that the title would be destined for several other platforms. As such it was written largely in native windows APIs such as DirectX, Direct sound, windows threading and so on. There was little abtraction in the graphics, sound and IO layers.
So we added all of that. We abstracted the graphics layer and put into place an OpenGL driver for the OSX port, we went through a similar process for sound support making use of OpenAL. For threading we just used pthreads for the most part. Perhaps we should have abstracted but we didn't in that case. The shaders were written in DirectX style assembly language and to move them over to OpenGL they were ported into HLSL.
Everytime we finish a title we're reminded of what it takes to actually finish a game.
You feel like your done, when it's feature complete; the graphics and sound are working, the control system is squared away and yet - you're really just half way.
We admit we felt like we'd finished when we reached this feature complete stage; we knew better intellectually but emotionally we fell for it all over again.
At feature complete, you start the gruelling bug fixing stage. It's amazing how many bugs a few good testers can find. We had hundreds, many pretty small but it adds mountains of time to completion. After bug fixing, you then have to package and prep for distribution, this is also suprisingly time consuming. Sorting out distribution platforms quirks, further testing, prepping marking art, liasing with the publishers, partners, testers, reviewers and so on - and we had a lot of help.
Nothing really beats the feeling of finish a title though. At least from our point of view. There is something deeply satisfying about it. I guess that's why we're in this business.
We hope you enjoy Eets for OSX! We certainly enjoyed getting it out there.
Friday, December 24, 2010
Downloading files from the Apple Developer website using wget (for poor connections or scheduling)
Recently we had some issues downloading the latest iphone SDK. Firstly due to a crappy 3G broadband connection; we never seemed to be able to download the entire 3.5 Gigabyte file without a dropout. Unfortunately for us, Apple seem to have overlooked this possibility with their developer website and they do not offer the download using a more robust facility. Note to Apple. Ftp would be nice.
Secondly with several team members located in the same city but not on the same LAN we wanted to distribute the update to all members via our shared linux server. Unfortunately, this said server is getting a little long in the tooth now and being a 32 bit linux distribution it does not support files of the size that is the Xcode and IOS dmg. We were going to have to split the file into more managable chunks. What a pain.
The command line tool wget often yields answers to these kinds of problems so consequently it was our initial foray into finding a solution. Firstly it can provide an extra layer of robustness for downloading files, secondly it's very easy to schedule downloads via cron. For those of you wondering why this is a consideration - welcome to the reality of living in the internet 3rd world - Australia. With the typical internet plans in Australia, heavy internet users such as ourselves find it important to spread our download usage between peak periods (any time you're likely to be awake) and offpeak periods (any time you're likely to be sleeping) to maximise our bandwidth allocation.
Frustratingly, downloading the IOS SDK via wget is complicated by the need for any web client connecting to the Apple Developer website to have been authenticated. The Apple website is known to use cookies to authenticate web clients, and several recipes for extracting authetication credentials from browser cookies into a file and using then via the wget command line interface are well known - at least for Firefox.
The basic procedure for accessing content using wget from a site requiring authentication involves logging into the said site using a standard web browser, once authenticated via a login page one can set abou extracting the authentication cookie from the browser. The extracted cookie is then fed to wget which can use the cookie for permission to download the desired content.
Being on a Macintosh system we are by default provided with Safari. Not bothering to install Firefox on every system one uses, we figured it was easier just to stick with Safari. Luckily the same technique can be performed with Safari as with Firefox. The technique for Safari is not as well known as the Firefox technique, so we'll cover it here.
Safari stores its cookies on a per user basis within a user's home directory. Specifically cookies are stored in a simple XML file. Have a look in Library/Cookies/Cookies.plist. You can see all of Safari's cookies in there.
To get the required cookie into the Cookies.plist before we proceed, use Safari to login to the Apple Developer Website using your Apple ID credentials. Safari should now have the requisite cookie. Opening the Cookies.plist with a text editor to view the cookie; we're looking for the one called ADCDownloadAuth.
With wget expecting it's cookie information in the nescape cookie.txt file format we'd like a quick and simple way to convert from one format to the other. Luckily this is relatively easy to do on a Macintosh system. As the language Ruby is preinstalled on Tiger, Leopard and Snow Leopard systems we may as well leverage the language to do this job.
Install the plist Ruby library and run the short ruby script listing below to convert the file to Firefox's cookies.txt format.
Now that we have our cookies.txt file we can download the file we would like. Note that the URL for the sdk was found by looking at Apple's Download website to see where the download link led.
Below is the wget command line used to download the Xcode and iPhone SDK. Note that the command line variables for wget tell it to pipe the downloaded file to split which breaks the file up to make our venerable Linux file and webserver happy (2GB file limit). We're splitting the download into 512mb chunks here.
To make sure the authetication works I needed to use the header flag and insert the cookie value at the command line. Looking at the cookie.txt file to again find the ADCDownloadAuth key and it's datavalue we place this data in exchange of the "XXX" marked command line below for this recipe to work.
You should now see your download commence and with everything to plan you'll have your dmg ready to install. You can ftp to you Macintosh. Once aboard you can
In order to restore the split components. Happy Developing with the latest SDK!
Secondly with several team members located in the same city but not on the same LAN we wanted to distribute the update to all members via our shared linux server. Unfortunately, this said server is getting a little long in the tooth now and being a 32 bit linux distribution it does not support files of the size that is the Xcode and IOS dmg. We were going to have to split the file into more managable chunks. What a pain.
The command line tool wget often yields answers to these kinds of problems so consequently it was our initial foray into finding a solution. Firstly it can provide an extra layer of robustness for downloading files, secondly it's very easy to schedule downloads via cron. For those of you wondering why this is a consideration - welcome to the reality of living in the internet 3rd world - Australia. With the typical internet plans in Australia, heavy internet users such as ourselves find it important to spread our download usage between peak periods (any time you're likely to be awake) and offpeak periods (any time you're likely to be sleeping) to maximise our bandwidth allocation.
Frustratingly, downloading the IOS SDK via wget is complicated by the need for any web client connecting to the Apple Developer website to have been authenticated. The Apple website is known to use cookies to authenticate web clients, and several recipes for extracting authetication credentials from browser cookies into a file and using then via the wget command line interface are well known - at least for Firefox.
The basic procedure for accessing content using wget from a site requiring authentication involves logging into the said site using a standard web browser, once authenticated via a login page one can set abou extracting the authentication cookie from the browser. The extracted cookie is then fed to wget which can use the cookie for permission to download the desired content.
Being on a Macintosh system we are by default provided with Safari. Not bothering to install Firefox on every system one uses, we figured it was easier just to stick with Safari. Luckily the same technique can be performed with Safari as with Firefox. The technique for Safari is not as well known as the Firefox technique, so we'll cover it here.
Safari stores its cookies on a per user basis within a user's home directory. Specifically cookies are stored in a simple XML file. Have a look in Library/Cookies/Cookies.plist. You can see all of Safari's cookies in there.
To get the required cookie into the Cookies.plist before we proceed, use Safari to login to the Apple Developer Website using your Apple ID credentials. Safari should now have the requisite cookie. Opening the Cookies.plist with a text editor to view the cookie; we're looking for the one called ADCDownloadAuth.
With wget expecting it's cookie information in the nescape cookie.txt file format we'd like a quick and simple way to convert from one format to the other. Luckily this is relatively easy to do on a Macintosh system. As the language Ruby is preinstalled on Tiger, Leopard and Snow Leopard systems we may as well leverage the language to do this job.
Install the plist Ruby library and run the short ruby script listing below to convert the file to Firefox's cookies.txt format.
$ sudo gem install plist
$ irb
>> require 'plist'
>> result = Plist::parse_xml("Library/Cookies/Cookies.plist")
>> File.open("cookies.txt", "w") {f result.each {r f.write("#{r["Domain"]}\tTRUE\t#{r["Path"]}\tFALSE\t#{r["Expires"].strftime("%s")}\t#{r["Name"]}\t#{r["Value"]}\n")}}
Now that we have our cookies.txt file we can download the file we would like. Note that the URL for the sdk was found by looking at Apple's Download website to see where the download link led.
Below is the wget command line used to download the Xcode and iPhone SDK. Note that the command line variables for wget tell it to pipe the downloaded file to split which breaks the file up to make our venerable Linux file and webserver happy (2GB file limit). We're splitting the download into 512mb chunks here.
To make sure the authetication works I needed to use the header flag and insert the cookie value at the command line. Looking at the cookie.txt file to again find the ADCDownloadAuth key and it's datavalue we place this data in exchange of the "XXX" marked command line below for this recipe to work.
wget -qO- -U firefox -ct 0 --timeout=60 --waitretry=60 --load-cookies cookies.txt -c http://adcdownload.apple.com/ios/ios_sdk_4.2__final/xcode_3.2.5_and_ios_sdk_4.2_final.dmg --header="Cookie: ADCDownloadAuth=XXX" | split --bytes=512m - xcode_3.2.5_and_ios_sdk_4.2_final.dmg You should now see your download commence and with everything to plan you'll have your dmg ready to install. You can ftp to you Macintosh. Once aboard you can
cat part1 part2 part3 ... > combined.dmgIn order to restore the split components. Happy Developing with the latest SDK!
Tuesday, August 31, 2010
Game replay techniques and the importance of floating point determinism
Working our way towards release we're currently going through a heavy bugfixing phase on the Macintosh version of Eets. One particularly interesting bug was causing incorrect level replays and the official solution video (not really videos but ingame replays) to be incorrect. We had a floating point determinism problem
Level completion replays and solution videos in Eets work by replaying user input. It makes a lot of sense to do this as user input is, relatively speaking, low frequency. To achieve the same results by recording the state of the all the objects in the game would make replay files a *lot* larger. (Consequently - The same technique can be used in writing a network game. Often known as the lockstep technique)
To be able to playback recorded user input into the game engine and have it play out exactly the same, the engine must be completely deterministic. A couple of key components needs to be addressed or things go very wrong.
For starters, the engine's random number generators are in fact not random at all. They need to play out the same random appearing numbers after being seeded each time. Secondly the mathematics of gameplay and engine need to be completely deterministic. This is actually not as easy as it sounds.
Next up, the physics engine needs to be designed from the beginning with determinism in mind. In particular iterative solvers are likely culprits for breaking determinism. Finally, the floating point math in all of it, needs to be deterministic. The floating point math situation is pontially one of the most tricky parts. Calls out to function in the operating system and other libraries - you frequently have not control over and they vary from platform to platform.
Once would think floating point math would always yield the same results, but the results actually vary slightly between processor, operating system, compiler and instruction set. Typically it's rounding method differences that are at play in this diverging scenario. (Did you know? - banking software avoids floats or doubles because of the way they handle rounding).
When floating point math was first catered for in silicon; a number of different ways of doing things made it out into the wild. The bulk of the computing public is using x86 type chips these days. In the early days of x86 floating point math was done in software, and understandably it was pretty slow. At some point the x87 co-processors were introduced. They were physically separate processors, and had their own instruction sets. Now the same instruction set exists today within your average Intel and AMD processor. It still gets used in software today but there are even more possibilities thrown into the mix. First came MMX (the multimedia instruction set), then MMX2, SSE, SSE2, and finally SEE3. Not to mention 3DNow and a similarly targeted instructions set. All of these instructions sets and their corresponding silicon implement floating point math in various ways and to varying degrees.
The Institute of Electrical and Electronic Engineers ratified a standard way of doing floating point math. The standard is known as ieee754. Making sure that your floating point math happens in a standardised way goes a long way to reducing the potential for different results.
Since most games engines update through time iteratively a small error early in the piece can create vastly different results down the track.
Mathematical methods like cos, tan and the other trigonometric functions are also common causes for different results on systems. The reason being that they're so called transcendental functions. That is they generate results by evaluating geometric series. Unfortunately this allows for plenty of scope for error.
Some tips on how to locate and improve floating point math determinism problems.
- Use modern ieee754 compliant processor instruction sets SSE and up. Many compilers can be told to automatically use them for floating point math, otherwise you can manually use them via compiler intrinsics or assembly code.
- Make sure you know what level of floating point optimisations are being using by the compiler when compiling. For the Microsoft Compilers look for problematic switches like /fp:fast. For gcc look for -mfpmath=sse and -msse and/or -msee2(x86 specific).
- Check results from Transcendental functions (tan, sin, cos and their ilk). If they're causing problems what in software versions outside of the system library that you have control over.
Wednesday, August 18, 2010
Howto to find out what gcc has as implicit defines
When dealing with portability and preprocessor issues while coding in C it is often very helpful to find out what all the default GCC compiler defined macros are. It's not immediately obvious how to see this. This is how you do it.
gcc -dM -E - < /dev/null
Wednesday, July 21, 2010
Preview release of KHI 2D technology coming soon
With the release of Eets for Macintosh coming soon, our attention is slowly moving on to our next project in development.
That as yet to be announced project is built upon a 2D engine that has been developed by ourselves.
While our main goal has been to support the development of our next title, we have tried to build it in a general, clean and reusable way. We've also always hoped to be able to release the engine technology for other people to use and we intend to continue to build and maintain it.
We're currently in the process of cleaning up an initial preview release of this technology. It's been tenatively named Simple Game Engine. It's an OpenGL based, accelerated, multi-platform 2D engine. Our initial goals we're to provide the following features to support the development of our game.
We're looking forward to sharing our initial preview release. WY6FHGGZUKB2
That as yet to be announced project is built upon a 2D engine that has been developed by ourselves.
While our main goal has been to support the development of our next title, we have tried to build it in a general, clean and reusable way. We've also always hoped to be able to release the engine technology for other people to use and we intend to continue to build and maintain it.
We're currently in the process of cleaning up an initial preview release of this technology. It's been tenatively named Simple Game Engine. It's an OpenGL based, accelerated, multi-platform 2D engine. Our initial goals we're to provide the following features to support the development of our game.
- 2D primitives
- Accelerated via OpenGL
- Loading of popular file types including, JPG, PNG, BMP, DDS and TGA
- Multi-platform capability
- Simple, easy to use API
- Abstraction of native platform window and viewport handling
- Usable from both C and C++ languages
- Design with long term goal to support consoles
We're looking forward to sharing our initial preview release. WY6FHGGZUKB2
Tuesday, July 6, 2010
Separate debug symbols, just like Windows
Currently we're working heavily on Linux. You might ask why, but for now you'll have to wait to find out.
Having become more familiar with heavy debugging under Linux we'd like to share with you a little tip about being able to ship binaries in a title that are still useful for debugging problems that are discovered out there in the wild.
This is achievable under Linux by shipping debug binaries that have the debugging symbols separated from the binaries.
Being able to do this under Windows is well known, in fact it's the default. Under Linux it's equally possible by using the less well know gcc debug-link functionality.
This functionality is particularly useful when a distributed application dumps core on a user. One can get the core file, use the separate debugging information and see exactly where the application crashed. All you need to do when you make a build is put aside the separate debug files.
Generally you don't want to distribute the debug symbols, for most people it's just a waste of space, and on the other hand it makes it easier for nefarious types to reverse engineer you code, or otherwise manipulate your software.
This is potentially handy to many others, game developers or otherwise who are working under Linux.
Separating debug symbols from the main binary is achieved with using objcopy which is part of the bintools package found on many Linux systems.
We're particularly interested in the command line arguments --only-keep-debug/--add-gnu-debuglink
--add-gnu-debuglink adds a .gnu_debuglink section to the binary. In that section is stored the name of debug file to look for.
Below is a short shell transcript of how this is achieved:
The first part is the name of the file, the second part is a check-sum of debug-info file for later reference.
Did you know that binaries also get stamped with a unique id when they are built? The ld --build-id flag stamps in a hash near the end of the link.
Although the actual file may change (due to prelink or similar) the hash will not be updated and remain constant.
The last piece of the puzzle is how gdb attempts to find the debug-info files when it is run. The main variable influencing this is the command debug-file-directory.
After starting gdb, one can ...
The first thing gdb does, which you can verify via an strace, is
search for a file called [debug-file-directory]/.build-id/xx/yyyyyy.dbg; where xx is the first two hexadecimal digits of the hash, and yyy the rest of it:
Next it moves onto the debug-link info filename. First it looks for the filename in same directory as the object being debugged. After that it looks for the file in a sub-directory called .debug/ in the same directory.
Finally, it prepends the debug-file-directory to the path of the object being inspected and looks for the debug info there. This is why the /usr/lib/debug directory looks like the root of a file-system; if you're looking for the debug-info of /usr/lib/libfoo.so it will be looked for in /usr/lib/debug/usr/lib/libfoo.so.
Interestingly, the sysroot and solib-search-path don't appear to have anything to do with these lookups. So if you change the sysroot, you also need to change the debug-file-directory to match.
Remember to keep the debug files for every build that gets distributed and you can load up the binary, core file and debug file all together and see exactly what happened.
Having become more familiar with heavy debugging under Linux we'd like to share with you a little tip about being able to ship binaries in a title that are still useful for debugging problems that are discovered out there in the wild.
This is achievable under Linux by shipping debug binaries that have the debugging symbols separated from the binaries.
Being able to do this under Windows is well known, in fact it's the default. Under Linux it's equally possible by using the less well know gcc debug-link functionality.
This functionality is particularly useful when a distributed application dumps core on a user. One can get the core file, use the separate debugging information and see exactly where the application crashed. All you need to do when you make a build is put aside the separate debug files.
Generally you don't want to distribute the debug symbols, for most people it's just a waste of space, and on the other hand it makes it easier for nefarious types to reverse engineer you code, or otherwise manipulate your software.
This is potentially handy to many others, game developers or otherwise who are working under Linux.
The How
Separating debug symbols from the main binary is achieved with using objcopy which is part of the bintools package found on many Linux systems.
We're particularly interested in the command line arguments --only-keep-debug/--add-gnu-debuglink
What do these command line flags do?
--add-gnu-debuglink adds a .gnu_debuglink section to the binary. In that section is stored the name of debug file to look for.
Below is a short shell transcript of how this is achieved:
$ gcc -g -shared -o libtest.so libtest.c
$ objcopy --only-keep-debug libtest.so libtest.dbg
$ objcopy --add-gnu-debuglink=libtest.dbg libtest.so
$ objdump -s -j .gnu_debuglink libtest.so

libtest.so:     file format elf32-i386

Contents of section .gnu_debuglink:
 0000 6c696274 6573742e 64656275 67000000  libtest.debug...
 0010 52a7fd0a                             R...
The first part is the name of the file, the second part is a check-sum of debug-info file for later reference.
Build ID
Did you know that binaries also get stamped with a unique id when they are built? The ld --build-id flag stamps in a hash near the end of the link.
$ readelf --wide --sections ./libtest.so  | grep build
  [ 1] .note.gnu.build-id NOTE            000000d4 0000d4 000024 00   A  0   0  4
$ objdump -s -j .note.gnu.build-id libtest.so

libtest.so:     file format elf32-i386

Contents of section .note.gnu.build-id:
 00d4 04000000 14000000 03000000 474e5500  ............GNU.
 00e4 a07ab0e4 7cd54f60 0f5cf66b 5799b05c  .z..|.O`.\.kW..\
 00f4 2d43f456                             -C.V
Although the actual file may change (due to prelink or similar) the hash will not be updated and remain constant.
Finding the debug info files
The last piece of the puzzle is how gdb attempts to find the debug-info files when it is run. The main variable influencing this is the command debug-file-directory.
After starting gdb, one can ...
(gdb) show debug-file-directory
The directory where separate debug symbols are searched for is "/usr/lib/debug".
The first thing gdb does, which you can verify via an strace, is
search for a file called [debug-file-directory]/.build-id/xx/yyyyyy.dbg; where xx is the first two hexadecimal digits of the hash, and yyy the rest of it:
$ objdump -s -j .note.gnu.build-id /bin/ls

/bin/ls:     file format elf32-i386

Contents of section .note.gnu.build-id:
 8048168 04000000 14000000 03000000 474e5500  ............GNU.
 8048178 c6fd8024 2a11673c 7c6a5af6 2c65b1b5  ...$*.g<|jZ.,e..
 8048188 d7e13fd4                             ..?.

... [running gdb /bin/ls] ...

access("/usr/lib/debug/.build-id/c6/fd80242a11673c7c6a5af62c65b1b5d7e13fd4.debug", F_OK) = -1 ENOENT (No such file or directory)
Next it moves onto the debug-link info filename. First it looks for the filename in same directory as the object being debugged. After that it looks for the file in a sub-directory called .debug/ in the same directory.
Finally, it prepends the debug-file-directory to the path of the object being inspected and looks for the debug info there. This is why the /usr/lib/debug directory looks like the root of a file-system; if you're looking for the debug-info of /usr/lib/libfoo.so it will be looked for in /usr/lib/debug/usr/lib/libfoo.so.
Interestingly, the sysroot and solib-search-path don't appear to have anything to do with these lookups. So if you change the sysroot, you also need to change the debug-file-directory to match.
Remember to keep the debug files for every build that gets distributed and you can load up the binary, core file and debug file all together and see exactly what happened.
Wednesday, June 23, 2010
Find awake IP addresses on a subnet using a batch file
I seem to frequently find myself trying to find machines by IP address on a subnet. Often I'm on a random Windows machine and I've got nothing but the basic install to do it. What do I do? Good 'o batch script. You can find machines awake on a subnet using a script like this. I might call it find_ip.bat
Just substitute your IP subnet for 192.168.0.x and away you go.
@echo off
SET t=0
:start
SET /a t=t+1
ping -n 1 -l 1 192.168.0.%t% > nul
if %errorlevel%==0 echo Host 192.168.0.%t% is UP!
IF %t%==254 Exit
Goto start
Just substitute your IP subnet for 192.168.0.x and away you go.
Friday, April 23, 2010
Unity 3D: A rough and ready computation of normals - useful for procedural meshes
Here is a rough and ready method to compute a meshes' vertex normals knowing the vertices and the indicies of your mesh.
List[] normalBuffer= new List [NumVerts];
for(int vl = 0; vl < normalBuffer.Length; ++vl) {
normalBuffer[vl] = new List();
}
for( int i = 0; i < NumIndices; i += 3 )
{
// get the three vertices that make the faces
Vector3 p1 = m_original[m_mesh.triangles[i+0]];
Vector3 p2 = m_original[m_mesh.triangles[i+1]];
Vector3 p3 = m_original[m_mesh.triangles[i+2]];
Vector3 v1 = p2 - p1;
Vector3 v2 = p3 - p1;
Vector3 normal = Vector3.Cross(v1, v2 );
normal.Normalize();
// Store the face's normal for each of the vertices that make up the face.
normalBuffer[m_mesh.triangles[i+0]].Add(normal);
normalBuffer[m_mesh.triangles[i+1]].Add(normal);
normalBuffer[m_mesh.triangles[i+2]].Add(normal);
}
for( int i = 0; i < NumVerts; ++i )
{
for (int j = 0; j < normalBuffer[i].Count; ++j) {
m_normals[i] += normalBuffer[i][j];
}
m_normals[i] /= normalBuffer[i].Count;
}
Wednesday, April 14, 2010
Unity 3D Immediate Mode: What's the trick with GL.modelview?
Unity 3D's immediate mode is really useful for debugging or adding a bit of chrome to a scene. While it's not the most efficient way of getting something on the screen it's so quick and handy. For those not using Unity 3D Pro. The GL namespace and functionality isn't available to you.
Here's a little tip for setting the GL.modelview matrix so you can pump local space vertices into you GL.Vertex calls and have everything appear in the right spot.
For example if I want to draw a line using model local space I need to setup the modelview matrix so GL primitives appear in the place in our 3D world.
First of all we grab the scene camera using for example (using the C# API) :
Next we need to compose a matrix that will take into account the scene camera's position and the position of the model we're using. The final trick of composing this matrix is to convert from a Left handed co-ordinate system to a right handed co-ordinate system.
Unity 3D normally uses a Left Handed camera co-ordinate system, where Z is postive leading out of the front of the camera. The underlying rendering system (originally designed on the Macintosh andOpenGL) is a Right Handed System (where Z is negative out of the Camera). The GL.modelview is expected to be in Right Handed.
So to composite the correct modelview matrix we're going to first create a matrix to transform from a left handed to right handed system. We could do:
Now we're ready to go, if we have the camera transform, the model tranforms and our conversion matrix. The result looks like this:
Now you can issue GL.Vertex3 commands in model local space
Here's a little tip for setting the GL.modelview matrix so you can pump local space vertices into you GL.Vertex calls and have everything appear in the right spot.
For example if I want to draw a line using model local space I need to setup the modelview matrix so GL primitives appear in the place in our 3D world.
First of all we grab the scene camera using for example (using the C# API) :
GameObject camera = GameObject.Find("Main Camera");Next we need to compose a matrix that will take into account the scene camera's position and the position of the model we're using. The final trick of composing this matrix is to convert from a Left handed co-ordinate system to a right handed co-ordinate system.
Unity 3D normally uses a Left Handed camera co-ordinate system, where Z is postive leading out of the front of the camera. The underlying rendering system (originally designed on the Macintosh andOpenGL) is a Right Handed System (where Z is negative out of the Camera). The GL.modelview is expected to be in Right Handed.
So to composite the correct modelview matrix we're going to first create a matrix to transform from a left handed to right handed system. We could do:
Matrix4x4 mat = Matrix4x4.identity;
mat[2,2] *= -1.0f;
Now we're ready to go, if we have the camera transform, the model tranforms and our conversion matrix. The result looks like this:
GL.modelview = mat * (camera.transform.worldToLocalMatrix * transform.localToWorldMatrix);
Now you can issue GL.Vertex3 commands in model local space
Subscribe to:
Posts (Atom)

 Posts
Posts


