Sunday, December 6, 2009

Compute Length of a String in Unity 3D

How to compute the length or size of a string in pixels wasn't immediately obvious to me in Unity 3D, which is why I thought I was quickly post how it can be done. Knowing the size of the string is often useful if you are developing your own complex controls of interfaces. It's also often commonly used for centering a string within a space.

In order to compute the size of a rendered string, you will need your string and the GUI style with which you intend to render your string, and then finally a GUI content convenience object in order to pass the string into the CalcSize method of the GUIStyle object. See below for UnityScript pseudocode.


/* declare the style and setup parameters with Unity 3D inspector */
var guiStyle : GUIStyle;

...

/* here is my string */
var myString : String = "this is my string";

/* create a content convenience object with which to pass the string */
var myContent : GUIContent = new GUIContent();
myContent.text = myString;

/* CalcSize will return the dimensions (width and height) of the rendered string in pixels */
var stringSize : Vector2 = guiStyle.CalcSize(myContent);


You can then get the x and y components on the returned Vector2 for the size of the string in pixels, width and height. Remember, the font size, font type, spacing and all the rest of the GUIStyle parameters you configured in the Unity 3D inspector will alter the final pixel size values of the string.

Friday, December 4, 2009

Derivation of the Perspective Matrix, Part 1

Preface

I have been wanting for some time to discuss in detail the Perspective Matrix. Not only do I find it an interesting topic but I have found numerous times during my career that it has helped to understand the Perspective Matrix and the math behind how it came into being. I'm not going to assume too much knowledge of the subject in this article so I'll start with the basics. Skip a bit if it's of no interest to you but I do hope that others will find this particular granularity of breakdown useful. I know it's been years since I've formally looked into the math behind this and I certainly befitted greatly from trying to explain how the perspective matrix works to others.

While this piece is intended to be read all together I decided to break it up into several easy to digest parts more suitable to appearing on a development log. It's entirely possible I've made mistakes or omissions and I invite readers to point them out. I, like everybody, is learning all the time.

Part 1

Since the gaming world went 3D the perspective matrix has come into it's element. Its the math which takes our 3D game world and displays it on our 2D televisions, monitors and screens. There are two common types of 3D projection, orthographic and perspective. Orthographic projection has it's place but for the most part it's perspective projection that does the heavy lifting in game titles.

Artists have been aware of the phenomena of perspective for thousands of years. In particular with regards to the apparent relative size differences of objects depending on their distance from the viewer. A good artist depicts perspective intuitively and artistically.

Over time mathematicians and natural scientists developed theories about perspective. The mathematics we use today seem to do a very good job of simulating perspective as we see it in the real world. Using linear algebra and the associated matrix math we can handily simulate a camera in our virtual 3D worlds.

While we are in the moment less interested in orthographic projection it does serve to understand a little about it and it's differences to perspective projection. An orthographic projection will map a 3D point on to a 2D surface by modeling how the light travels from a 3D point to the 2D surface. The ray of light will intersect the projection surface orthogonally to that surface, in other words with a right angle – a perfect 90 degrees to the 2D surface. You could think of this as a lot like shadows projected on to a wall (an ray of anti-light if you like); as if you were playing with shadow puppets. The 2D surface will need to be at least as big as the 3D object in order to receive the projected rays at 90 degrees (in the natural world – in mathematics we are able to scale things).

A camera, or an eye for that matter, is different, and a perspective projection will more accurately apply in this case. To understand why, one has to imagine what the light might be doing in order to reach the lens of the eye or camera. The viewing eye is quite small, so light that is viewed will be the light rays that will travel from the 3D point to the point where the eye is located. There is no condition on the light having to strike the 2D viewing surface orthogonally. In effect light will arrive at different angles on the 2D plane depending on its source distance and orientation. This is where the visual effect of perspective comes into existence. This is obviously simplified as an eye and a camera have a lens which changes the way the light travels, but we can ignore that for now.

In your typical game, world co-ordinates are 3D co-ordinates relative to an arbitrary world origin. Camera or eye co-ordinates are 3D co-ordinates which are relative to an origin that is specified as being the position of the eye or camera.

If we setup a little thought experiment and layout a diagram on paper or computer we can start to see where the mathematics will come from. Let us assume the geometry we're dealing with (points, lines and so on) has already been transformed from world co-ordinates to eye co-ordinates and that the projection plane is the same as the front clipping plane. It's not really relevant to this discussion so we'll ignore how that happens for now.

If you reference the figure below you will be able to see how we imagine this model of our camera to be. A Right Handed Co-ordinate system is in place. We are using a viewing frustum aligned with the Z axis (the Z axis is relative to the eye so we subscript it with the lowercase e), with a near/front clipping plane at Ze = D, and far clipping plane at Ze = F, and the view angle we have represented by the half height of the frustum h. Note that the half height can also be represented by the viewing angle divided by 2. In this diagram we label the viewing angle with the lowercase Greek letter theta.

Let us start by working through the transformation of a point in 3D space to a point in 2D space. For simplicity sake the 2D space we're talking about is our near clipping plane. If you like, what we project on here gets displayed onto our screen as a 2D image.

As stated earlier we have agreed our 2D plane on which we are projecting is located at the near clip plane. If we want to be able to position points on this plane we need to give it a co-ordinate system of it's own. By convention this is known as screen space. Screen space being 2D will only have 2D co-ordinates, for simplicity we make the origin the center of the screen. In the figure above we can imagine it being the point at which the eye Z axis intersects our viewing plane.

Using the mathematics of projection we can establish a projected 3D points position on the 2D plane by using the formula
To understand this equation lets look at a more simple equation. The equation is Xss = Xe * D / Ze. It looks very much like the original formula above. What we see here is simply an application of the principle of similar triangles. If the angles of one triangle are equal to the angles of another triangle, then the triangles are said to be equiangular. These equiangular triangles have the same shape but may have different sizes. So equiangular triangles are also known as similar triangles. This principle is relevant here, if you look at the figure. This principle states that the ratio of the length of the sides of two triangle remains the same for similar triangles.

This principle then allows us to see where Xss = Xe * D / Ze comes from. The two triangles we propose are similar are the triangle formed by the eye, a point on Xe and a point on Ze. The second triangle is the one formed by the eye, a point on Xs and the point D along the Ze axis. We can see they are similar triangles so thus the length ratio between the sides from the eye to D and Eye to Ze will be the same ratio between eye to Xe and screen origin to Xs. Knowing this ratio we simply multiply the ratio by the length of the side we do know about on the other triangle, yielding the length of the side we're interested in which happens to be Xss.

So now we understand where we get the first part of the projection, the part for the X axis at least. The same principle works exactly the same along the Y axis.

That part was straightforwards enough, but we know that we're still missing the h term from our simplified formula. Now lets look at where the half height of the screen comes in to the equation. The half height of the screen is another way of expressing the field of view of the camera. The field of view of the camera we signify in this example as the angle theta. It is easy to see that if we increase the value of h the screen area we have for projecting on to is much larger. Dividing Xe * D / Ze by h will yield Xs as a value in screen space.

Using basic trigonometry we can see that


So substituting this back into our equation we get

which becomes

and this for our Y axis component

So here have arrived at two simple equations for projection of a point on to the 2D plane we've decided is our screen. We can use our equations from this position in our journey to do more, which I'll cover in part 2.

Tuesday, November 10, 2009

An stlport tip, for solving linker errors (stlpmtx_std vs stlp_std)

We've been making heavy use of stlport for our projects. Stlport is a great, freely available library that one can use on plaforms without a mature C++ stl library. A number of our team experienced problems when building an stlport application; specifically linker errors.

A common cause of link errors while making use of STLPort is variations in the compile flags between the stlport library itself (if it needed to be compiled - often it's headers only, depending on how you use it) and the applicaton.

With the output errors, check the namespace of the missing methods, it might tell you something about what's happening. The specific problem occuring for members of our team was yielding errors with a signature of form:

stlpmtx_std::methodname

Eventually we realized the application was compiled with stlport in a non thread safe form (i.e. _NOTHREADS defined), but my the systems' dynamic libraries (of stlport) were compiled as thread safe (generating the corresponding link table name prefix signature - stlp_std::methodname).

Hopefully this will help somebody who might be confused or stumped with the same issue.

Tuesday, November 3, 2009

Use a Xbox 360 Controller with Cortex Command on the Macintosh

As you may know Kruger Heavy Industries brought Cortex Command to the Macintosh. It was a work of love, and continues to be as Cortex Command works it's way up to being content complete (and finally finished). We work on a build now and then and when Data Realms is finally satisfied the game is complete we'll have many more avenues available to us to promote and distribute the game. Many magazines and stores understandably won't stock or promote unfinished products.

In the mean time I wanted to mention one cool thing about the Macintosh version of Cortex Command that I don't think many people are aware of. It's possible to use a Xbox 360 controller with Cortex Command, and the experience is greatly benefited for it.

Cortex Command was from the outset designed with consoles in mind. From the circular menu systems allowing for easy option selection with a D-pad or joystick, to the targeting system that remains easy to work with a joystick it was always a design consideration. Data Realms hopes to bring this title to a console one day. As do we.

So for Cortex Commanders why not play the game as it was intended - with a console controller.

Microsoft have had available for the purchase the "Xbox 360 Controller for Windows" for some time now. It's basically identical to your typical wired Xbox 360 controller but comes with the Windows driver CD. If you don't have an Xbox 360, this is probably the easiest way to get a hold of a controller.

For a wired Xbox 360 Controller, it's just USB. Plug it into your Macintosh and it's ready to use.

For those with Xbox 360 Wireless controllers you can get a PC receiver for you Xbox 360 wireless controller. There is a brief description here. It just plugs into your USB port and they're relatively available. Note however, that it's probably cheaper just to buy a wired controller for windows. Depends on how much you value your wirelessness (I think I made that word up).

So once you have yourself a controller we can use it on the Macintosh thanks to Tattie Bogle who wrote the driver for Macinosh OSX. You can find out about it and fetch it from here. I believe it now supports both the Wired controller and the Wireless Controller.


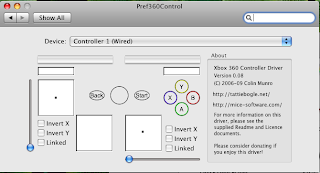
Install the Xbox 360 controller driver and then you can insert you controller into the USB port of your Macintosh. If you go to the controller options via the Apple menu you can open up the controller calibration settings.


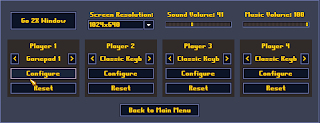
Once you've got all that installed and configured you can fire up Cortex Command, choose the Options submenu from the Main menu and you'll see the options menus as show below.


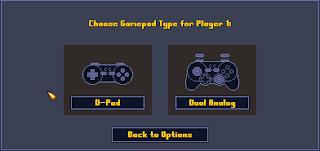
From here use the left and right arrow buttons to select the Gamepad as the control scheme you'd like to use for your player and choose "configure". You'll then be presented with a screen to allow you to select the kind of controller you'd like configure.


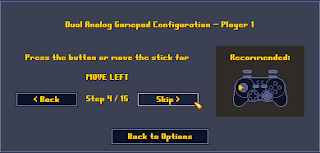
Choose the Dual Analog controller as this is what matches the Xbox 360 controller type. Once you've done that you can assign the different actions to the controller joysticks, buttons, triggers and menu buttons, as show below.


From there you can go back to the Main menu and fire up the game and play it with you controller. It's undoubtedly the best way! Enjoy!

Thursday, October 22, 2009

OSX: Carbon Event Loop not firing - Application unresponsive

In the development of Eets I've been using Apple's Carbon API. As some of my peers have correctly pointed out Carbon is slowly being deprecated, at least publically (outside of Apple). I'm pretty sure I've read somewhere that the Carbon API is still being heavy used to support the features underneath (for example in the Cocoa API). So this will likely be the last time I get to use it on any serious. I've already noticed that Googling for Carbon problems doesn't return a boatload of results. So I figure it's a pretty naive way of telling that Carbon it's really where the action is these days.

I'm a little saddened by this. I think it's a well designed and useful API and I've found it quite enjoyable to use but it's clear that slowly C and C++ fall out of favour (yes, yes not without good reasons - I guess I'm just getting old and nostalgic).

In case of the possibility there are some others out there still plugging away with Carbon or at least having a bit of a play, this post is for you!

I had a particularly annoying problem the other night, and it stumped me for longer tham I'd like to admit. It was only some old crusty websites and a mailing list archive that gave me any clues as to what the problem might be. So for the sake of "paying it forward" I just thought I'd mention this problem I had and hope it might help somebody just like me. It was a very unintuitive problem. Most likely because I don't completely understand the way Carbon works with it's disk based resources.

Eets, the title I'm working on, is basically a C++ and Carbon application. I am using CMake to generate the Xcode files. When the products are build, the .app directory and files are cobbled together mostly by hand (or by a script I wrote). I'd used interface builder to setup the basic window and toolbar settings. Somewhere along the line I'd obviously changed something outside of interface builder in the interface nib files.

In my C++ code I've setup the basic Event loops, Events and Event Handlers. My problem began after adding some features and a compile. The main window would open but the whole application would just freeze. The menu wouldn't appear and the application window wouldn't respond to mouse clicks or drags. The window would just sit there and lose focus to any other window in it's way.

I noticed this specifically happened once the code had started up and entered the RunApplicationEventLoop.

I kept thinking I'd setup the Event loop incorrectly or there was a bug in my code. I spent ages trying to work out what I could have done wrong. When I paused the application in the debugger the callstack looked like the one below.


#0 0x900074c8 in mach_msg_trap ()
#1 0x90007018 in mach_msg ()
#2 0x90191708 in __CFRunLoopRun ()
#3 0x90195e94 in CFRunLoopRunSpecific ()
#4 0x927d5f88 in GetWindowList ()
#5 0x927dc6f0 in GetMainEventQueue ()
#6 0x927fe1c8 in GetApplicationTextEncoding ()
#7 0x927fb698 in RunApplicationEventLoop ()
#8 0x0000a264 in main (argc=2141449080, argv=0x38810040)


I eventually worked out what the problem was. It turns out that
RunApplicationEventLoop was freezing, and it was basically not handling events properly. This occurs when the CFBundleExecutable value in Info.plist file of the application bundle doesn't match the application name (set by "PRODUCT_NAME" in the build preferences of Xcode). Deep down within Carbon this apparently stops events from working.

Annoyingly Eets, at the time, wasn't even being built as a bundle so I had to change that. It was time consuming and fiddly to do so - as CMake doesn't really have great support for Xcode application bundles, frameworks etc. It's getting there ... slowly.

After I changed CMake to create an application bundle and setup the Info.plist and .app directory structure, Eets is again working. I didn't change any of the C++ code to fix it. I just setup the .app as apparently required. Well I did learn something, even thought it wasted some time.

I hope this is of use to some Carbon API users out there.

Tuesday, October 13, 2009

Eets: Hunger. It's Emotional coming to Mac OSX

We hinted at the coming of Eets in an earlier development log post. Now we can tell you that Eets. Hunger. It's Emotional is on it's way to the Macintosh. We love this quirkly little platform puzzler and we hope that Macintosh owners will too.

Eets was originally developed by Klei Entertainment for the PC. Later in 2007, Klei developed Eets. Chowdown for the Xbox 360 LIVE Arcade which was well received. Klei have now moved on to some new and exciting titles but it was their wish to see Eets come to the Macintosh. That's where we stepped in. We're now very excited to be part of bringing Eets to a new (and our adored) plaform.

Eets has been described as a homage to some classic games of the past the likes of Lemmings and The Incredible Machine. With it's bright colours and eccentric cast of creatures you quickly find yourself endeared by this title. Players must navigate Eets to the end goal, a "puzzle piece", of each level by using a mix of beasties and contraptions with their own unique abilities and properties. Prankster Whales, Marshomechs, Chocolate Cannons and Radioactive Gingseng all play a part in solving the puzzles preventing Eets from getting where he's going. Food is greatly important to Eets and it directly affects his mood, thereby changing the way Eets will navigate his way through the level. We all agree, Eets is a very hungry animal - although it's not clear what kind of animal he is. At first sight it's not unreasonable to think of him as a dog, but I've seen him described as a tadpole with legs and teeth.

Adding an extra dimension to the title is the inbuilt level builder allowing for user generated content. It adds hours of entertainment to Eets, when you've had your fill of playing through the levels shipped with the game.

Bringing it to the Macintosh has been quite a challenge. It was engineered originally with little expectation of it ever coming to the Macintosh platform. Written directly on top of the Windows API and DirectX we've had to recode large parts of it to run it on the Macintosh; including a total rewrite of the graphics code to make use of Open GL. It's coming along nicely with the game almost playable (see very early development screenshot below).


The big things left remaining to address on the Macintosh version of Eets are sound and some control issues. We're pretty confident the majority of the really heavy lifting has been done and progress from this point on will be straight forward (touch wood).

We'll keep you posted on progress as we get closer to releasing this fantastic title for the Macintosh.

Sunday, October 4, 2009

Unity3D: Useful Tricks with Delegates

It's probably fair to say that Unity developers are quite a broad community skills wise. There is mix of first time game developers, seasoned professionals, programmer orientated folks and those of a more artistic nature. For me that's part of the beauty of Unity it has purpose at so many different levels.

I wasn't that clear on a target audience for this post but I figure it's going to be of more use to the less experienced coders amongst us.

As somewhat of an aside, I'd be curious to see the breakdown of Unity developers between those who exclusively use UnityScript (js) and those who predominantly use C#. I'm using a mix, initially I was sticking more with C#, since it's more similar to the language I know best which is C++. Now I find the terseness and succinctness of the UnityScript quite compelling and I've been using it a lot for the last few components I've work on. There's a downside to UnityScript for sure, but this isn't the topic I set out upon.

One thing I kind of miss when using UnityScript in/as a behavior is the ability to create interfaces. When I say interfaces I mean in the object oriented sense. Interfaces are great when you want to interact with a whole bunch of different objects in the same way. To be more explicit lets look at it in the Unity context.

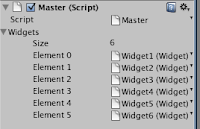
So lets say I've got a GameObject which has an array of other game objects. (see screenshots).

Normally these would be all identical objects, but what if we want to their functionality to vary somewhat from item to item? In object oriented languages this would be the realm of an interface, but in a Unity behavior (even thought it's an object oriented language) we don't directly have the capability of using an interface. So what can we do?

We can use delegates. Delegates applied sparingly can somewhat mimic this nice object orientated characteristic. It's not quite as elegant but it works just fine.

First of all, it's reasonable to ask if you've never come across the term. “What is a delegate?” It's called something slightly different depending on the computing language are talking about. In C and C++ the equivalent functionality you'd term a function pointer. In my mind the simplest description would be that a delegate is essentially a variable that contains a function or a method. You can “call” the variable just a like a function, and you can assign a function to the variable. If it doesn't make sense now, you may want to read a bit further to see it in action. This might make it clearer.

Say for example we have a bunch of GameObjects. Sticking with some sort of familiar tradition lets call them widgets. So we've got a bunch of widget GameObjects, we've attached our widget script and they're all working nicely. Now if we'd like their behavior to vary a little, how are we going to do that?

First of all lets define a widget script with a delegate that gets called in place of the normal functionality. Once we've done that we can attach another script to each widget to further refine it's behavior. The second script will attach to any selected widget GameObject and assign its own function to the delegate in the primary widget script. In this way you can modify the behavior of the original widget method however you wish. Let's look at some example code of this description, I'm of the opinion it will be much easier to understand.

In my example I have a Master GameObject that contains an array of Widgets. The code of the example script is as such. Note the public array of widgets. This is exposed the inspector screen just as we like it. We assigned our selected widgets in the inspector (see screenshot).


/* Master.js */

public var widgets : Widget[];

function Update () {
for (var i = 0; widgets.Length; i++) {
widgets[i].DoSomething();
}
}


Next we create our Widget GameObjects and their associated widget script.

The widget script is kind of like our object orientated interface through which our Master game object interacts with the widgets. As far as the Master GameObject is concerned, all the widgets are identical.


/* Widget.js */

private var doSomethingDelegate = null;

function SetDoSomethingDelegate(func) {
doSomethingDelegate = func;
}

function DoSomething() {
if (doSomethingDelegate) {
doSomethingDelegate();
} else {
/*
Typical do something code ...
*/
}
}

function Update () {
}


For deviation of the widget behavior, let's look at the DoSomethingElse script, which will attach to a widget and this modify it's behavior when DoSomething is called. Note that the DoSomethingElse is assigned in this scripts Awake function. This assures it's ready to go when the action begins.


/* DoSomethingElse.js */
private var widget : Widget = null;

function Awake() {
widget = GetComponent(Widget);
widget.SetDoSomethingDelegate(DoSomethingElse);
}

function DoSomethingElse() {
/*
The brand new wacky functionality that is different to the other widgets
*/
}

function Update () {
}

@script RequireComponent(Widget)


Finally note the “RequireComponent” directive to really make it clear that this script depends on the Widget script being in place.

So as I hope you can see we can now modify a widget's behavior in a myriad of ways using this technique.

Thursday, October 1, 2009

Monday, September 21, 2009

What's in the works

As a recently formed independent games studio, we've been asked a number of times what our game plan is (pun intended). Starting the studio in Western Australia after working for some big name developers and publishers in Europe represents quite a change. Not only a simple change in geography but a huge change in proximity to the big market zeitgeist, talent pool and investment/funding opportunities.

Despite having some experience in the industry to fall back on we're under no illusions as to what we can realisticaly achieve in a given timeframe. Not to mention we're all a bit older now than when we first entered the industry. No midnight crunches for us while trying to support families and preserve relationships. Initially we're going to keep things simple.

For me that means the first and most import goal is publishing something. Set attainable goals and achieve them; get the dev cycles going and something on the table. Don't get me wrong, I want to create something special, but even Speilberg didn't create his finest films on his first foray out the door. So something special, but achievable.

We were thinking about how this studio might work months before we left our industry jobs and made the migration to Australia. Looking around at opportunities to achieve our goals we did find a path that we think is a good place to start.

It's always been my feeling that to create something worthwhile, it never hurts to understand what makes something worthwile. This thinking walks hand in hand with the ability to identify greatness in others or another's achievements. It was this thinking and a fortuitous meeting of minds with the developers from Data Realms that laid the path we would choose to take for an initial foray into Indie Game Development.

Data Realms have spent years crafting a beautiful indie game known as Cortex Command. The first time I played it was a hurried affair in a lunch break. My initial exploration didn't do it justice but my interest was perked. A few weeks later with more time on my hands (and with a freshly downloaded build) I was able to spend enough time playing Cortex Command to begin to truely appreciate it. I felt then and still feel now that Cortex Command is one of those creative products that has some sort of destiny. With an idea in mind and a fanboy's appreciation in my heart, that motivated me to bring Cortex Command to the Macintosh. Spiritually, the Macintosh version of Cortex Command is the first title for Kruger Heavy Industries. The fact that it was mostly completed by myself before the company was formed probably only matters to the record keepers on Moby Games.

Later in the piece we were very happy to have elected to be involved with Cortex Command. It did very well at the last Games Developers Conference 2009 in the Indie Games Festival, picking up two awards (Technical Excellence and the Audience Award) (some video coverage available here).


Cortex Command is still actively in development, but is largely code complete - at least as far as the Macintosh porting effort is concerned. It's bugfixing and build making for the most part until release. A day we look forward to greatly. Dan, Prom and the rest from Data Realms are doing a fantastic job.

So, what else is in the works for Kruger Heavy Industries? Fresh from our experience porting Cortex Command we picked up another great game we felt deserved some love on the Macintosh. Currently in active development is the Macintosh version of Eets: Hunger. It's Emotional. It was developed by our friends over at Klei Entertainment. One of their first titles, it's been lavished with much love and attention to detail by the Klei team. We won't tell you too much about Eets right at this moment as we're looking forward to that in a future post. For now we would like you to know we're really looking forward to having Eets playable on the Macintosh and putting that second building block into the foundation of our little studio here in Western Australia.

Monday, September 14, 2009

First Experiences with Unity 3D

I first heard about Unity 3D early last year when some rumblings were made about it in Indie Games Circles. I wasn't really doing much with regards to Indie Games at the time and the company I was working for at time had it's own technology. On top of that Unity 3D was only really available for the Macintosh platform at the time (Windows version was still in Development). With all that in mind it didn't seem like I was going to get a chance to try out Unity 3D any time soon.

Fast forward now to last month. I've just started a new contract for a local mob. We're using Unity 3D, predominately on the Windows platform. So I've finally got the chance to look at Unity 3D properly. My first impressions have been predominately positive.

Unity is probably best described as a Game Engine and Editor “all in one”. It's an IDE, a level editor and properties tweaker. The professional version also has some source control functionality. There is a lot of functionality included in the package an it has the potential to save an enormous amount of development time.

The User Interface

The User Interface is visually appealing, I suppose it would have to be to suit the fashion concious Macintosh crowd. The main interface is broken up in to several areas, the Game View, the Scene View, the Hierarchy View, an Assets View and the Inspector. The game view allows you to review the status of your Game, it's essentially what the game would like. It can be set to run, pause and stop basically allow you to run the game and see what's happening as you build it. If you want to see an animation running in your scene all you have to do is hit play.

The scene view is similar to the Game view but is more orientated towards the actual development process. The scene view will show the scene and level objects in a simple form as well as many of the other implicit objects required for the game logic. The Camera in the scene view is free moving. Models and Game objects can be orientated, placed and scaled all the in the scene view. The interface is quite a lot like 3DS Max in the basic controls.

The hierarchy view (a panel really) is clearly inspired by a Scene Graph. It is essentially a list of objects in the scene, it also displays (via it's heirarchical nature) how these scene objects relate to each other. With it you can quickly find any object in your scene. In the Hierarchy panel, you can select an object, then when you move your mouse pointer over the scene display, pressing “F” will focus the scene view on the select hierarchy object. This without a doubt saves a lot of time. The hierarchy view is also useful for attaching components (behavior modifiers, graphical sugar and script/logic) to your scene objects.

The inspector panel works closely with the hierarchy and asset views. All objects, behaviors and such in your scene have properties associated with them. These properties are exposed by the inspector and can be directly manipulated. Running the game in real time and tweaking values in the inspector allows you to rapidly tune settings for a visual effect or game play behavior.
Finally the last main view or panel is the Project or Asset panel. This is where you can see all the assets in the scene. It's also where you can import new assets into the scene and construct prefab objects (objects that can be used again and again). All assets that have been imported into the assets can be edited from their new locations. Changes are re-imported and applied almost instantly.

Programming

The actual programming side of is done via scripts written in Javascript or C# . Although there is the ability to use plugins in the professional version which are written in C, C++ and or C# - I assume on the Macintosh version we can also use Objective C). The Javascript is really UnityScript I suppose, while sharing many similarities with Javascript there are some notable differences as well, particularly when it comes to the way objects work.


Scripts are typically assigned to game objects where their interfaces are called as the game logic progresses. Scripts assigned to game objects are known as behaviors. The script editor built into Unity 3D is Scite which is a well known simple editor. For more professional programmers who are used to the fully feature code environments such as the likes of Microsoft Visual Studio they may be disappointed. The environment notably lacks any easily accessible debugging, so you'll probably be spending a lot of time doing the old print debugging thing of yesteryear. Thankfully as everything else about the environment makes achieving results easy, this probably isn't as painful as it sounds. At least for small projects.

Under the hood Unity basically creates dynamic libraries with the code that is compiled from the Game scene in development. This is most likely how the Unityscript/Javascript is so fast. Indeed the it becomes apparent that the Javascript i really just a thin veneer over the C# innards and as you start to realise the Unityscript's differences to Javascript it becomes clearer what is going on underneath. Of course it's not Microsoft .Net implementation but rather the C# implementation made available via the Mono project.

Source Control

In the professional version, Unity's own source control functionality is available. It's not brilliant. It's some hodgepodge or Unity 3D UI, with a backend of a Postgres database. Over low latency links it's horrible and generally it lacks features. Strangely it's also one of the most expensive accessories for Unity. I can sort of the see the logic in it, those requiring source control will most likely be the ones cashed up enough to be able to afford it. In effect subsidising the cost of Unity's development and cheap price to Indie Developers and students.

Conclusion

I'm overall feeling positive towards Unity 3D. I've still got a lot to learn but I can see enormous utility in the package for what amounts to (especially for Indies) a lot of bang for you buck. Depending on how my experiences go I may consider using the Engine/Tool myself on a title I've been mooting. I hope to post updates on my experiences as I go.

Wednesday, September 2, 2009

Net2Max is in my good books

I've been using Net2Max for a couple of months now and I've been pretty happy with it. It's not exactly user friendly but once you understand the basics it does the job better and cheaper than everything else I've tried.

My business number runs on the system. I just chose the country and state I wanted the number to be associated with and connected it to my Net2Max and account and voila - I've got a business number. I've connected this number to a PABX system that I configured on Net2Max to do call routing exactly how I want. For the most part it goes to my voicemail box. Messages that are left get emailed to me immediately, and since I'm almost always online I can check them immediately.

If my business ever wants to expand or have a presence in another state or country, I can easily select a local presence number in just about every significant country. All the calls get routed back to my account.

Alternatively I can can configure any voip phone to receive calls for this number, of my skype account if I so wish. It's extremely versatile. I've got a Belkin VOIP router at home, I've got four standard phone ports in the back. One port is configured for my home phone number, the 2nd port is configured to my business number. During the evening, I plugin my wireless handset into port 1. During the day, if I'm working from my home office, I plug the handset into port 2 and switch off the voicemail.

All that flexibility is very useful and it comes at a reasonable price too. I'm currently spending about $3.00 Australian a month on business calls, the business number rental, voicemail and the pabx. I don't know how they do it so cheap. Best of all I think is the complete control I have over everything. I don't have to call up some dope on the phone and ask them to change the configuration of anything, it's all handled through a website online that I can login to from anywhere.

For me calling up is one of the last things I like to do, so this a huge plus to me.

Tuesday, May 5, 2009

Welcome

Well a warm hello. This is the start of our development blog. Lets see how we go. We'll be blogging about technical things, the studio and other interesting things related to games development and Indie Games.